Around and around and around we go. It has been more than four years since I posted. And more than seven years since I posted about the worst. But it all feels so familiar now.
Rilke could do for now. But he's far more hopeful than I feel. From Letters to A Young Poet:
Therefore, dear Sir, love your solitude and try to sing out with the
pain it causes you. For those who are near you are far away... and this
shows that the space around you is beginning to grow vast.... be happy
about your growth, in which of course you can't take anyone with you,
and be gentle with those who stay behind; be confident and calm in front
of them and don't torment them with your doubts and don't frighten them
with your faith or joy, which they wouldn't be able to comprehend. Seek
out some simple and true feeling of what you have in common with them,
which doesn't necessarily have to alter when you yourself change again
and again; when you see them, love life in a form that is not your own
and be indulgent toward those who are growing old, who are afraid of the
aloneness that you trust.... and don't expect any understanding; but
believe in a love that is being stored up for you like an inheritance,
and have faith that in this love there is a strength and a blessing so
large that you can travel as far as you wish without having to step
outside it.
I remember this quotation from a novel I am too embarrassed to name, but it involves the cutting of one's flesh in an ancient tradition - "the pain of the flesh is nothing." In my case, I would want it to be everything. What a relief that would be, manifesting something on the outside, to purge it from the inside.
Saturday, April 11, 2015
Thursday, March 03, 2011
Just a Happy Post

Flowers for me from J on Valentine's. He knows I don't really like roses, at least the long stem variety.

J and Ruby Begonia, my professor's dog, whom we took care of (and his amazing house) for the week.

More on the chocolate cake and the panna cotta in the far back next post!
Monday, February 14, 2011
Happy Valentine's!

Thursday, February 10, 2011
Rainbow Stripes


It seemed to work: the deadline gave me fuel for writing all day, and knitting and TV gave me relief at night. But, I wouldn't want to keep this schedule up forever. Which is a bit problematic, since I need to cough up three more chapters, and an introduction and conclusion, sometime next year!
One thing that has also helped, for those of you who write and get writer's block, is a little web site called 750 Words. It's basically a private place where you can type up 750 words everyday (or more, up to you) and have it be about total hogwash - whatever you need to dump from your brain. It's private, protected, and you can unload your thoughts without thinking about how literate it sounds or how others may judge it. I've used it a couple times at sticky points in my chapter, just to blab about what I wanted to write but, for the life of me, couldn't put into what I thought were "acceptable" terms. Try it! The site counts your words for you, gives you "badges" for writing (although I don't care about those so much), runs stats on what you're writing (pie charts etc.), and - for some reason this is freeing for me - it isn't stored on your computer, in fact, you can just forget about it once you're done (although the site does save your writing for you on your account).
As of now, I'm on a break from work after finishing the chapter. J is coming for a visit next week and we are planning a dinner party, visit to NYC, and other fun items. Stay tuned!
Sunday, January 16, 2011
Eating My Way through Taiwan: Breakfast

Happy New Year! I had the chance to visit Taiwan again this winter break, and I come back, of course, laden with food pictures. It can't be helped. Taiwan is the land of promiscuous eating and inventive, crazy cuisine. But I thought we'd start with something traditional, soothing, and a little zen: rice porridge (or xi fan or congee or zho). It is, as you can see, simply rice cooked with an abundant amount of water. Here there is a little piece of yam added, which is cooked along with the rice. I ate this for breakfast almost everyday growing up. In our home we usually added pickled vegetables or dried shredded pork (ro song) to eat along with it. But, Taiwan being Taiwan, this particular bowl of rice porridge was accompanied by a no-holds-barred selection of xiao zhi or "little eats."

Clockwise from top: traditional egg and tomato, bamboo shoots, steamed ground pork with a steamed egg yolk on top, and garlicky green beans.

Clockwise from top: cured Chinese sausage, sauteed offal, crispy pickled cucumber, chopped mustard greens, wine soaked little clams, and wheat gluten.
But another very traditional breakfast is centered around soy bean milk - although rice porridge definitely can be included. This is probably my favorite type of Chinese breakfast, easily bought off the street in Taiwan:

Strips of dough are lined up to be deep fried into you tiao (literally "oil stick'). You can see fried flat breads on the counter
where the long line of breakfast patrons are waiting- those can be stuffed with, believe it or not, you tiao (carb loading!)
or roast beef and scallions or myriad other things.

You tiao sizzling in oil.

And all the trimmings: you tiao, steamed pork dumplings (xiao long bao), piping hot sweet soy milk - along with
one bowl of salty soy milk with you tiao and one bowl of sweet rice gruel with peanuts.
Jia Bong! That's Taiwanese for "let's eat!"
Saturday, December 18, 2010
Macarons, Entrelac, and Sprinkles


Macarons and cookie goodness from friends visiting from Chicago.

Noro Bonbori yarn, almost at the end of a center pull ball... Like a glowing cave.

What I knit with that yarn: my entrelac scarf. It was a joy to knit, really.

It reminds me of sea glass - brown, green, and blue.
A Very Merry Christmas and Happy New Year to all!
Thursday, October 21, 2010
My Life in Yarn
I'm back. Rather than blog about Rhinebeck and show the pictures everyone else will show, let me catch you up on my life by showing you the yarn I bought at the festival. (For those who are non-yarny out there, Rhinebeck is the city where the New York Sheep and Wool Festival is held yearly - it's the biggest festival of its kind in the country. Every year, knitters, bloggers, vendors, sheep sellers, and quasi-knitting celebrities head there...)

First up: this is tweedy looking wool, eh? You know what's tweedy? University professors are generally tweedy. At least in New England. I am happy to announce that I have finally achieved the status of All But Dissertation. This means I have jumped through all the hoops they've set out for me - courses, exams, and a defense of my dissertation project - and all I've got left is the dissertation. Like my fellow PhD program friend says, the "new car smell" lasts only for a little bit, and then you're stuck with the enormous burden of having to churn out a couple hundred pages of what you hope will be brilliant stuff. But onwards and upwards!

I bought this silky skein thinking of the ocean. I had just crossed the Atlantic twice, once on my way to and from England to see J, who's just started his lectureship. His apartment is right on the English Channel, and we can see the moody waves from his windows! They are just "sea peeps," as the realtor had described them, but they are peeps of the sea nonetheless! It was a lovely week of knitting and . . .

. . . love! This silk yarn is a blood-red color, and its twisted skein reminds me of the human heart. J and I got engaged this last week in England. It's all a bit crazy and yet very matter-of-fact at the same time. I knew this was coming, I had thought about it and felt good about it. But our story is a bit crazier than usual.
Indulge me in a bit of George Eliot. When I think of my life in the last five years, I think of this quote from the end of Middlemarch (you have been warned: if you do not want to know the ending, stop reading here). I am not a noble Dorothea, nor is D (or Molt, as he was fondly called in this blog many moons ago) Casaubon - no! not at all. J, however, is actually a bit like young Will Ladislaw. So I think of this quote:
"Sir James never ceased to regard Dorothea's second marriage as a mistake; and indeed this remained the tradition concerning it in Middlemarch, where she was spoken of to a younger generation as a fine girl who married a sickly clergyman, old enough to be her father, and in little more than a year after his death gave up her estate to marry his cousin - young enough to have been his son, with no property, and not well-born. Those who had not seen anything of Dorothea usually observed that she could not have been 'a nice woman', else she would not have married either the one or the other.
Certainly those determining acts of her life were not ideally beautiful. They were the mixed result of a young and noble impulse struggling amidst the conditions of an imperfect social state, in which great feelings will often take the aspect of error, and great faith the aspect of illusion. For there is no creature whose inward being is so strong that it is not greatly determined by what lies outside of it. A new Theresa will hardly have the opportunity of reforming a conventual life, any more than a new Antigone will spend her heroic piety in daring all for the sake of a brother's burial: the medium in which their ardent deeds took shape is for ever gone. But we insignificant people with our daily words and acts are preparing the lives of many Dorotheas, some of which may present a far sadder sacrifice than that of the Dorothea whose story we know."

Finally, and, yes, this one's a bit of a stretch in terms of yarn metaphors, but there are some fuzzy details and cloudy skies right now. D and I are trying to sell our house. We are almost there...but it has been a very trying process. Difficult buyers and a prolonged negotiation process has really sapped the spirit out of me sometimes. But hopefully this will all be over soon.
So! That is why I have been silent for so long. In the weeks from Oct. 1 until now I have 1) had my birthday, 2) defended my dissertation project and become ABD, 3) flown to England, 4) gotten engaged, 5) gone to Rhinebeck, and 6) advanced toward closing on the house. Fingers crossed on that last item!
Now for more knitting, reading, writing, planning, and hoping.

Yarn details: darker brown skeins Shetland Silk Tweed "Dana" 2-ply laceweight from Swift River Farm, 95% organic Shetland wool, 5% bombyx silk;
lighter brown skein Shetland Supreme 2-ply lace from Jamieson & Smith, 100% undyed Shetland wool, colorway "Moorit."
First up: this is tweedy looking wool, eh? You know what's tweedy? University professors are generally tweedy. At least in New England. I am happy to announce that I have finally achieved the status of All But Dissertation. This means I have jumped through all the hoops they've set out for me - courses, exams, and a defense of my dissertation project - and all I've got left is the dissertation. Like my fellow PhD program friend says, the "new car smell" lasts only for a little bit, and then you're stuck with the enormous burden of having to churn out a couple hundred pages of what you hope will be brilliant stuff. But onwards and upwards!

Yarn details: "Nona" 2-ply laceweight from Spirit Trail Fiberworks, 50% merino, 25% cashmere, 25% bombyx silk, colowary "Adirondack."
I bought this silky skein thinking of the ocean. I had just crossed the Atlantic twice, once on my way to and from England to see J, who's just started his lectureship. His apartment is right on the English Channel, and we can see the moody waves from his windows! They are just "sea peeps," as the realtor had described them, but they are peeps of the sea nonetheless! It was a lovely week of knitting and . . .

Yarn details: "Atropos" 2-ply laceweight from Spirit Trail Fiberworks, 100% bombyx silk, colorway "Scarlett."
. . . love! This silk yarn is a blood-red color, and its twisted skein reminds me of the human heart. J and I got engaged this last week in England. It's all a bit crazy and yet very matter-of-fact at the same time. I knew this was coming, I had thought about it and felt good about it. But our story is a bit crazier than usual.
Indulge me in a bit of George Eliot. When I think of my life in the last five years, I think of this quote from the end of Middlemarch (you have been warned: if you do not want to know the ending, stop reading here). I am not a noble Dorothea, nor is D (or Molt, as he was fondly called in this blog many moons ago) Casaubon - no! not at all. J, however, is actually a bit like young Will Ladislaw. So I think of this quote:
"Sir James never ceased to regard Dorothea's second marriage as a mistake; and indeed this remained the tradition concerning it in Middlemarch, where she was spoken of to a younger generation as a fine girl who married a sickly clergyman, old enough to be her father, and in little more than a year after his death gave up her estate to marry his cousin - young enough to have been his son, with no property, and not well-born. Those who had not seen anything of Dorothea usually observed that she could not have been 'a nice woman', else she would not have married either the one or the other.
Certainly those determining acts of her life were not ideally beautiful. They were the mixed result of a young and noble impulse struggling amidst the conditions of an imperfect social state, in which great feelings will often take the aspect of error, and great faith the aspect of illusion. For there is no creature whose inward being is so strong that it is not greatly determined by what lies outside of it. A new Theresa will hardly have the opportunity of reforming a conventual life, any more than a new Antigone will spend her heroic piety in daring all for the sake of a brother's burial: the medium in which their ardent deeds took shape is for ever gone. But we insignificant people with our daily words and acts are preparing the lives of many Dorotheas, some of which may present a far sadder sacrifice than that of the Dorothea whose story we know."

Yarn details: oatmeal colored ball is worsted baby alpaca/silk 70/30 from Times Remembered, colorway "Suede";
blue skein is "Rio" fingering from Times Remembered, 100% prime alpaca, colorway "Wedgewood."
Finally, and, yes, this one's a bit of a stretch in terms of yarn metaphors, but there are some fuzzy details and cloudy skies right now. D and I are trying to sell our house. We are almost there...but it has been a very trying process. Difficult buyers and a prolonged negotiation process has really sapped the spirit out of me sometimes. But hopefully this will all be over soon.
So! That is why I have been silent for so long. In the weeks from Oct. 1 until now I have 1) had my birthday, 2) defended my dissertation project and become ABD, 3) flown to England, 4) gotten engaged, 5) gone to Rhinebeck, and 6) advanced toward closing on the house. Fingers crossed on that last item!
Now for more knitting, reading, writing, planning, and hoping.
Thursday, September 09, 2010
Wandering: And Trying To Settle Down...

A coastal cedar grove at Point Lobos, California.
I'm in the process of selling a house (!), beginning to teach again at the university, unpacking from a big move, and getting used to living an ocean apart from J. All in all enough to make a girl very, very blue. I know that a routine will soon develop, and that structure will go a long ways to make things seem comfortable and home-like again. In the meantime, I'll just hang on, posting meditative pictures and looking forward.
Tuesday, August 31, 2010
Interruption: Fraud and Moving
To all my Yale friends and to anyone living in CT and thinking of hiring movers: do NOT hire Connecticut Movers, run by Joshua Banks with the telephone 203.516.1010. They are a FRAUD.
I called to hire movers and was told, by Josh, that they would be available on-call for me when I was ready to unload my truck. The day of the move, with full truck on its way to the house I was unloading at, I called Josh. He told me that the movers were on their way and he would call to check their ETA.
That was the last I heard from him.
No movers EVER showed up.
Josh turned off his cell phone so that I went straight to voice mail.
This is the web site so you can identify them:
http://www.connecticutmovinghelp.com/home
I intend to contact the Better Business Bureau and the CT Department of Consumer Protection, but I'm posting this here in hopes that google searchers looking for a mover will see this and be warned.
Saturday, August 21, 2010
Making: Greenleaf Baby Blanket


Samples of jacquard from Fibre Designs
The blanket was my second lace pattern, a much easier experience than knitting the Forest Canopy Shawl. For one thing, there are no increases and, therefore, no infernal counting of stitches to make sure I hadn't screwed up.

This one took a bit longer to get finished, since I've been zipping from Germany to the SF Bay Area and North Carolina. I delivered the blanket yesterday - hopefully it'll be big enough! The baby is already 8 lbs and not due for another three weeks! Labor induction is in order, I think, if the baby doesn't come very soon. Maybe while we're here! Since I've never been around for all the hustle and bustle of a birth before that would be pretty exciting.
Raveled here.
Wednesday, August 11, 2010
Travel, Travel, Travel
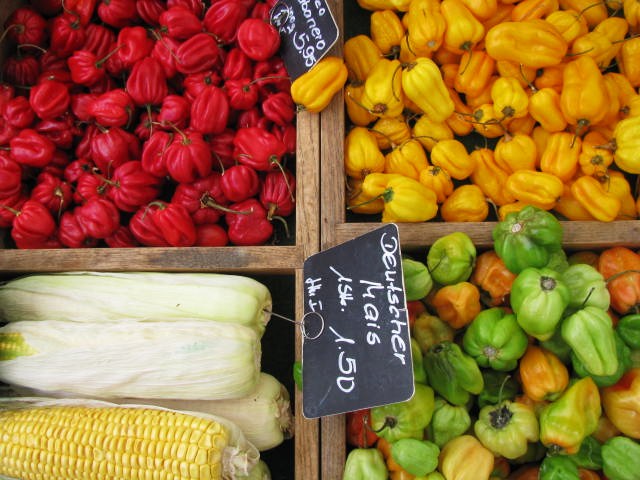
Habaneros and corn at the Viktualienmarkt in Munich.

Carousing at the Englischer Garten in Munich.

Cream tea in Teignmouth, a coastal village in Devon, England.

Dipping my feet in the English Channel.

Lots of lovely train rides.
Next up: two lovely weeks in the San Francisco Bay Area with my family and North Carolina with John's. It's a very fond farewell I'm saying to Germany, but I'll be back. And I'm looking very much forward to the future.
Monday, August 02, 2010
Making: Birthday Present...

1) Use the same material throughout a project, with the same fiber content. I used a 100% merino yarn for the cover front (in white) and it just didn't have the same feel. It was a bit floppier than the grey backing.
2) BLOCK gauge swatches!!! Especially if you have to have both rectangle shapes line up exactly to be sewn! I can't emphasize this enough. I just wasn't thinking, knit my swatches, measured, calculated, and then went on to knit two fine rectangles. Then I wet blocked them. Lo and behold, the white merino grew waaay to much. I had to force it a bit back down to size.
3) Learn a proper seaming technique rather than just fudging it with crochet. Although, I think the crochet trim isn't too bad in this project, it could be better. And it sort of exacerbated the fact that the two rectangles weren't perfectly aligned in size.


Kindle DX Dimensions: 10.4" x 7.2" x 0.38"
Yarn: 1 skein Millefine, Lana Grossa, 50g, 100m, 50% Merino 50% Acrylic – back and flap; 1.5 skeins Siena Big, Wolle Rödel, 50g, 80m, 100% Merino – front, with button
Needle: 3.0mm / 3 US
Gauge (blocked!) : 4.5 stitches / inch in seed stitch (Millefine); 5.25 stitches / inch in garter stitch (Siena Big)
Back of Cover and Flap:
Cast on 34 stitches of back and flap color yarn.
Work in seed stitch until 10.7 inches long.
Purl an entire row.
Knit the entire next row. This will form a stockinette stitch ridge which will form the fold for the envelope flap.
Work in seed stitch for next 10 rows.
Begin decrease to form triangle of the envelope flap:
ssk first two stitches, seed stitch (knit every purl stitch, purl every knit sticht), k2tog last two stitches until only 12 stitches left.
Bind off in pattern loosely.
Work on Cover Front:
Cast on 40 stitches in cover front color and work in garter stitch until 10.7" long, bind off loosely.
Wash and block both pieces to size.
Crochet sides closed using single crochet stitch and an alternate color of yarn (if desired). Crochet envelope flap edging also using single crotchet stitches.
Sew on button.
Crochet button loop on envelope flap.

Friday, July 30, 2010
Feasting: Last Meals in Heidelberg
We've had some fantastic German food here in Heidelberg. Let's reminisce:


A traditional Bavarian Weisswurst breakfast. At Zum Franziskaner.

Traditional Palatinate blood sausage and liver Knödel, always with buttery potatoes. At Kulturbrauerei.

Lots of wonderful beers: zum Wohl!

One of my favorite ways to spend a Saturday: hike to the monastery and eat fresh cheese, bread, and olives there in the open air.

But I've got to say that my favorite German thing to eat here is Schweinshaxe: roast crackling pork knuckle -
the one above is at one of our favorite restaurants, Vetter, served with sauerkraut, Semmelknödel, and mustard.
As you can see, this ain't for the weak of heart - or the weak of stomach. I will miss all this hearty goodness. But we still have this weekend in Munich! Let's see what they have on offer there...
Wednesday, July 28, 2010
Wandering: The Road Goes Ever On And On

Dusk at the Jesuitenkirche.
This is my last week in Heidelberg... I won't be flying back to the States for another week or so, but after this Friday I'll be traveling around, first to Munich and then to the UK, then back here to pack up and go. I can't tell you how sad this makes me! I never expected to live in Germany or to become so fond of it, but Heidelberg has really become home in the last year. I will miss:

the view from my apartment onto the rooftops of the Altstadt and the hills of the Philosophenweg,

peering into bakery windows to see what ridiculous pastries they're hawking,

meeting friends for lunch in plazas,

wandering around on little trails,

pausing on the Old Bridge to look at distant hills and to wonder what lies beyond...
But aside from these things, I will miss the home this place has given me. It really has been a haven after a very tough couple of years. It has been an ideal place to study, think, explore, recover, and take delight in life and the world.
Monday, July 26, 2010
Making: Designing!

The reason I pulled these out this last weekend is because I'm designing a little knit project - very simple, actually - that needs a bit of embroidery to give it that final flourish. If you're my sister: STOP READING NOW. If you're not, the gift is a Kindle cover, two very simple rectangles knit together, with a buttoned envelope flap. But I need something small in a corner to make it sweet. I couldn't settle on anything for the longest time. Should it be floral? A little bird? Birds are such the rage now: I see them on everything from tote bags to jewelry. An owl would be fitting with the book theme. What about a pattern from tiles I've seen in Istanbul? Or is a simple heart too twee?


But the roving presents such lovely color combinations. Whoever packed that little bag has a gift. Let's look at it again!


Subscribe to:
Posts (Atom)